Share with us how you customize your recipes to "Make It Mine"
Half Sour Pickles
Welcome to the world of pickling and fermentation. To start there are several different methods for making pickles, one that involves heat and one that involves soaking the cucumbers in a brine (salt) solution. And of course there are sweet pickles vs. dill pickles but we are all about dill pickles here.
The heat method makes jarred pickles that are "shelf stable" which means you don't have to refrigerate them until they are opened, like those you find on the grocery store shelves. The brining method is basically soaking the pickles in the brine until they ferment to the right level and are "sour" enough for you. Like the pickles you would see in the old general store sitting in a big jar on the shelf.
The salt acts as a preservative discouraging the growth of bad bacteria and encouraging the growth of the good stuff. That is why fermented foods are so good for you . The longer you leave them without refrigeration sitting in the brine the more sour they become. So they are referred to as half sour and full sour pickles.
Full sour pickles will make your mouth pucker and your eyes close if you take a bite. They are what are commonly used on an Italian Sub in the northeast to give it that distinctive flavor (so always get pickles on your Italian Sub!). From the time the brine is added to the jar with the cukes the fermentation process begins. And it continues unabated until you put the jar in the refrigerator. At that point it will continue but at a much slower pace because of the temperature. Think of it like leaving milk on the counter or in the refrigerator, it will eventually go bad in the fridge but at a much slower rate than if you left it out on the shelf.
The longer they sit out the softer they will get and the more fermented, or sour, they become. This recipe could actually be called refrigerator pickles. I wanted a pickle like they use at Sam Lagrassa's sandwich shop in Boston. I asked him once if he made them and he told me they come in from New York. No surprise there. The other place where lightly fermented or half sour pickles are very famous is at Rein's Deli in Vernon, CT right off Exit 65 on I-84. Both are great but I like these better!
I let these sit out for about 8 hours which seems to be the perfect time. You can certainly experiment with this and I encourage you to do so. Just remember if you let them sit out leave the top loose because there is gas building up in this process and you don't want any "pickle explosions."
And I use only fresh dill and fresh garlic. Many people add coriander seeds, mustard seed, black pepper corns, red pepper flakes, etc., etc. That is up to you. I like them simple and fresh tasting most of the time.
So enough of all that, let's get to making some pickles. And this is really simple so don't be intimidated by the number of instructions, I just wanted to make sure everything was discussed. Have fun and check back with us to let us know how you make out.
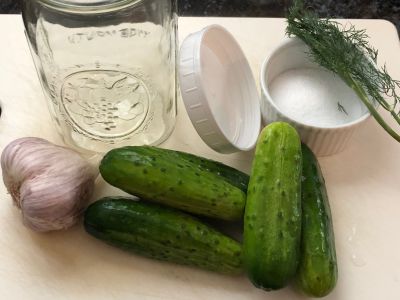
Ingredients
- 4 c water
- 2 T + 2 t kosher salt (without anti-caking agent)
- 4-6 pickling cukes
- 1/4 t of Pickle Crisp
- 1 lg clove garlic, lightly smashed and cut in half
- Several sprigs of fresh dill
Note - We are going for a 3 1/2% brine solution if you have a scale. I use kosher salt from the San Francisco Salt Company but you can use any pickling salt or kosher salt that does not contain an anti-caking agent, like table salt. From my understanding Diamond Crystal does not contain an anti-caking agent but Morton's does. However, Morton's and Ball both make specific pickling salt that you should be able to find at your local grocer. While you can use salts with additives, they may turn the pickles dark or add odd flavors and/or textures to your pickles.
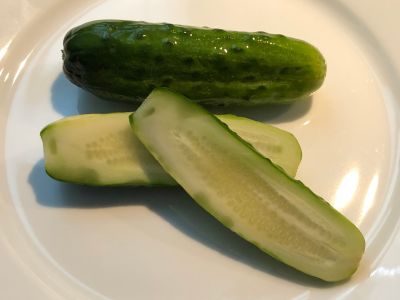
Note - The fresher the better and the smaller the better in my mind. If you start with an old or soft cucumber, there is no way you are going to get crispy pickles. This is much more important if you are going to leave them out fermenting for any period of time.
Note - I prefer pickling whole cukes but you can certainly cut them lengthwise into spears. They will react a little more quickly so I would try the spears at 3-4 days as opposed to the 7 days for the whole cukes. Again, experiment and find what you like, there is no right and wrong here.
Note - This is calcium chloride, the same ingredient you find in canned tomatoes originating in the US as opposed to Italy where they don't typically use it. Which is why San Marzono tomatoes fall apart when you pick them up but Hunt's stay whole and round. See the write up on Tomatoes that discusses calcium chloride, although I encourage you to read the whole article.
Note - When I buy a bunch of fresh dill there is way too much to use for one batch of pickles. So I portion it out into the amount I would use for a jar of pickles, place it in a sandwich bag and then in a freezer safe bag or vacuum sealer and freeze it. You will have fresh dill for your pickles year round. And feel free to use the fresh dill you find in the produce section of your grocery store. You should be able to get 5-7 quarts of pickles out of one of those plastic containers.
Instructions
1. Add 2 cups of water to a 4 cup microwave save measuring cup and microwave on high for 3 minutes. The salt will dissolve better in warm water but it is not necessarily required.
2. Add the salt and stir until the water is completely clear. If it remains somewhat cloudy that is ok, you probably have anti-caking agent in the salt or other impurities.
3. When the salt is fully dissolved, add ice cubes to bring the water level up to just shy of 4 cups. You can also add cold water if you need your ice for cold drinks.

4. While you're waiting for the water to cool down, wash the pickling cukes and trim the ends of any that have stems protruding. These can inhibit the development of the pickles.


5. Lightly smash and peel 1 medium large garlic clove. You don't want to smash it fully like you would if you were going to chop it and add it to sauce or something. It should remain mostly whole but just cracked down the middle. Pull it apart into two pieces. Yes, if it falls into 3 pieces that is fine.

6. Trim the dill but leave it whole, do not chop it up.


7. Add the Pickle Crisp to your mason jar or other canning jar. I like this because it is convenient. You can also use fresh grape leaves or even oak leaves for this but be careful that the trees or plants have not been sprayed.

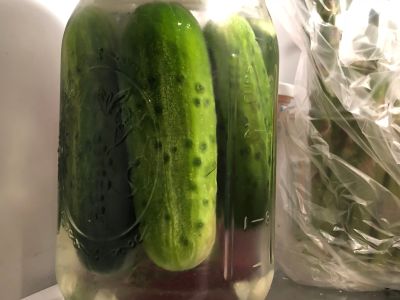
8. Add the cukes, garlic and dill to your jar. You can pack them in pretty tight but leave a little room for the brine to circulate.

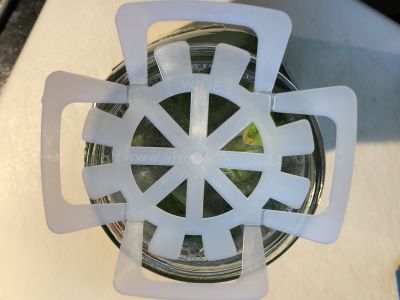
9. You need a strategy to hold the pickles under the liquid. I use the Visco Disc Jar Topper inserts pictured below that do the job really well. And they make an "inerter" which pushes the topper down into the jar but I just do that by hand. But if you are using whole pickling cukes you can usually pack them in so that just the volume of them holds them below the top of the jar where it starts to get narrower. Not all that important when doing refrigerator pickles but if you are fermenting you have to have a means to keep the cukes submerged in the brine.


10. When the ice has melted top off the measuring cup to 4 cups.
11. Add the liquid to the jar so it is within about 1/2' to 1" from the top of the jar.

12. Cover the jar loosely and let it sit out on the counter for 8 hours or so. Yes, overnight is fine. See the discussion in the introduction about levels of fermentation.

13. After letting it sit out on the counter, tighten the lid and turn the jar several times to mix everything up. Loosen the lid slightly and place the jar in the refrigerator.
14. Every day or two tighten the lid and mix it up again. I like to loosen it during this process although there is not much fermentation taking place because it is in the refrigerator so there is not much of a gas build up.
Summary
I like them after about 1 week but you can try them after 3 days and see when they are ready for your taste.

And the pickles will last in the refrigerator for months but may lose some of their crispness. They are not "bad" unless you see weird looking foam at the top or any king of red coloring in the jar. If that happens, discard them. And be careful taking them out of the jar. It is better to use a clean fork because if you are dipping your fingers into the jar you are introducing bacteria which over time can cause them to go bad even with all the salt in the brine.
And my guess is they won't last long anyhow so plan to make a new jar every 4-7 days in the summer so you always have fresh stock. Enjoy and tell us how you change this recipe to make it yours. Enjoy!
| Recipe Yield: | Serves 4 |
| Prep Active: | 30 Minutes |
| Prep Inactive: | 3+ Days |
Share Your Opinion of this Recipe and How You "Make It Mine"
We're very glad you have chosen to share your thoughts. It's what we're all about. (All comments are moderated)
Please enter your name so people will know which comments are yours. You can use your real name or pick a user name if you prefer. To subscribe to our newsletter, enter your email address. And we never share any of your information with anyone, EVER! And if you submit a rating it must be accompanied by a comment and a name to be counted.
Get Our Newsletter!
Follow Us!

Recent Comments
Meat Loaf
The meatloaf was moist, smooth and cooked perfectly through. The glaze was different but terrific...a nice change. Totally recommend and I give 5 s...
Eileen -- 5/17/18
I boil mine in the pressure cooker for 5 minutes, the easiest eggs to peel
Kori -- 4/10/18