Share with us how you customize your recipes to "Make It Mine"
Perfect Hard Boiled Eggs that Peel Every Time
I have been in search of the best way to cook hard boiled eggs that peel easily and cleanly every time and whose yolks are cooked but not dried out. Sounds simple you would think. People have been boiling eggs for centuries. But inevitably I would end up with anywhere from 3 to 10 eggs out of a dozen that wouldn't peel properly and would result in missing chunks of egg white. They absolutely wouldn't work for deviled eggs unless you were prepping a food fight for Bluto and his buddies at Animal House! But finally, after combining several methods and tricks, I have found the perfect technique for hard boiling eggs!
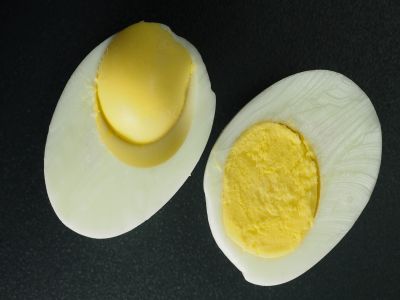
I am happy to report that it works every time and you can even boil them a day or two ahead and use them when you are ready. With thanks to Julia Childs and my favorite Boston bartender Chrissy, here you go.
4. Thanks for the Pin Julia >>
5. Watch for the Bubbles >>
7. Everybody into the Pool >>
8. You're Cracking Me Up >>
1. Just Tell Me How to Do It
Here's what you do. If you would like more info with pictures and such, just keep reading.
- Fill a pot with enough water to cover the eggs and bring it to a boil
- While the water is coming to a boil, line up your eggs in the carton with the big end on top
- Using a push pin, poke a hole directly in the center of the top of each egg
- When the water is boiling, lower each egg into the water with a spoon
- When all the eggs are in, start the timer
- Keep the water at a simmer, about 205° F
- While the eggs are cooking, fill a bowl with plenty of ice and water
- After 14 minutes, remove the eggs to the ice bath
- Place the bowl in the refrigerator and wait at least 30 minutes if you want cold eggs
- To peel the eggs, tap the side on the countertop and peel under lightly running water, sliding your thumb between the membrane and the egg white
- Store the unpeeled eggs in the water in the refrigerator for up to 4 days
2. Dispel the Old Wives' Tales
After years of reading cookbooks, online recipes and blogs and watching people on YouTube, I had just about given up. People talk about the secret being old eggs, they peel better. Really? And for years I had started the eggs in cold water and brought them to a boil and then started the timer. Then of course they needed to go into an ice bath to make the egg shrink away from the shell. Really?

Some of the other tips and tricks include peeling the egg under running water, shaking it in a glass of water, standing on one foot while holding the egg out the window of a moving car -- sorry, just kidding on that last one but that's what it feels like sometimes. And they all worked some of the time. The problem is finding something that works virtually every time. I will add that in the four or five dozen I have cooked so far using this method, I have had a 100% success rate.
This all came about one evening while I was at my favorite watering hole on Beacon Hill talking cooking with Chrissy and somehow the topic of eggs came up. She said she just plops them into boiling water and they peel just fine. Ok. So I thought let me give that a try. But also at the same time was thinking of my old friend Julia Child and her push pin trick. And thus the solution was found.
And just to be sure, I decided to go to Wilson's Farm in Lexington and get some extra large eggs that were laid that day. If we are going to do this, might as well go all the way and dispel the "old eggs are better" thing also. I didn't cook them until the next day so technically they were one day old at that point. Good luck finding a one day old egg in a grocery store.

3. Big End, Small End, What?
The first thing we need to do is determine the big end of the egg and the small end of the egg. The reason for this is there is a gas or air pocket in the large end of the egg. If we leave it there is a chance the air will expand in the boiling water and the increased pressure could crack the egg. In most eggs it's easy to determine the big end, however there are some eggs, as seen by the egg on the left in the picture below, where it can be difficult to determine the large end and the small end.
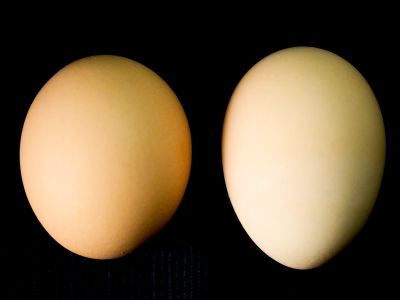
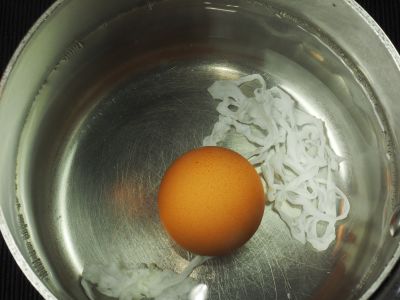
If you do prick the wrong end and stick the pin in the small end, the expanding air will force the egg white out of the shell rather than the air coming directly out. It can make a mess in the pot but other than that it is harmless. We will discuss later how to mitigate the damage if that happens.

4. Thanks for the Pin Julia
Once we have found the big ends place the eggs in the carton with the big end facing up. This will hold them upright and immobile.

The next step is a trick I learned from a Julia Childs cookbook called "The Way To Cook." I don't keep near as many cookbooks on the bookshelf as I used to but this is one that will always be with me. However, even though Julia discusses pricking the egg to let the gas out, she goes through a long method of cooking that brings the eggs to a boil in cold water, then removes them from the heat for a while, then plunges them into an ice bath, then back into boiling water and then into an ice bath again. So I did all that and the shells still stuck to the egg. Very disappointed, although some of them were fine of course.

So now that our eggs are ready and waiting in the egg carton, we are going to prick them with a push pin to about 1/4? deep just making sure we are through the shell.
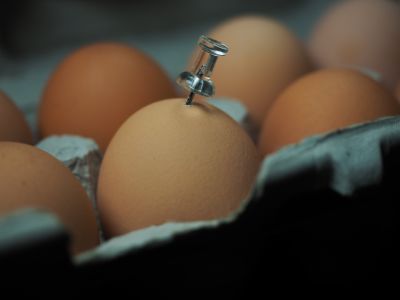
Now all our eggs are ready to go into the boiling water.

5. Watch for the Bubbles
I think the best way to put the eggs in the water is to gently lower them in with a spoon with the egg laying on it's side. If you do this, as soon as the egg hits the water watch for a stream of bubbles coming from the pin hole. That is a good sign that the gas is escaping. If you see any egg white coming out of the hole, remove the egg and move on to the next one. The hole is either in the wrong end or the inner membrane was punctured with the pin.
6. Ya But How Long Do I Boil It?
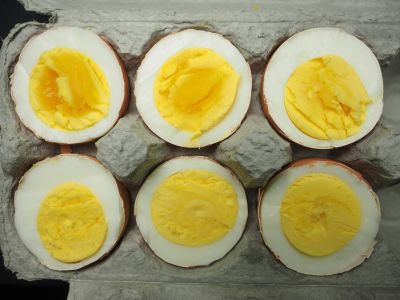
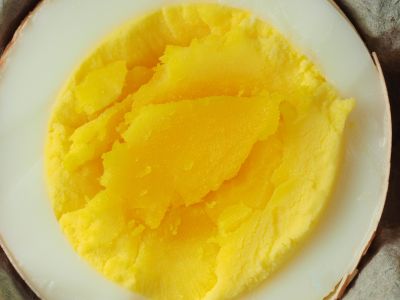
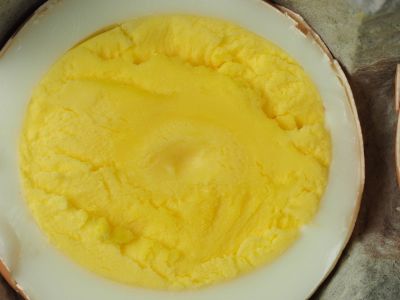
Once all the eggs are in the water, go ahead and start the timer. This time shouldn't vary too much but feel free to alter it to your liking. I did eggs for 11, 12, 13, 14, 15 and 16 minutes with pictures below. Remember these are extra large eggs pretty much straight from the refrigerator. I think the 14 minute egg looks perfect but the 15 and 16 would work also, especially for something like deviled eggs where you are adding moisture to the yolks. Clearly the 11 and 12 minute eggs are not "hard" cooked. And the 13 is in my opinion just under cooked ever so slightly.




7. Everybody into the Pool
While the eggs are cooking, prepare an ice bath which is merely a cooking term for a big bowl of ice water. You want a bowl large enough to hold enough ice and water to easily cover the eggs and also withstand the heat of the eggs without melting all the ice.

Once the timer expires, immediately remove the eggs from the boiling water using a spoon and lower them into the ice bath. After all the eggs are in the water, place the bowl in the refrigerator. If you are going to use them immediately it is not really necessary to place them in the refrigerator, but make sure you keep ice in the bowl. Let them chill for at least 30 minutes before using.

8. You're Cracking Me Up
Once the eggs are cooled and you are ready to use them, remove them one at a time from the ice bath and tap the side of the egg on the countertop to crack it. Using your thumb, find the edge of the cracked area where it meets the uncracked part and pull the shell up and away from the egg. Once the peeling process is started, you will feel the membrane and the egg white, the membrane being the abrasive part and the egg white being the slippery part.

Peel between the membrane and the egg white to remove all of the shell. Be a little careful here until you get the feel for it as you can tear the egg if you pull the shell too hard and it doesn't break into pieces. Some shells are tougher than others. And I find it much easier to peel with less "danger" of an egg shell nicking the egg white if you peel them under lightly running water. It helps to wash the shells away and also helps the membrane to separate from the egg.

9. Will You Still Love Me Tomorrow?
The last question is how do I store my eggs and how long will they last. Regarding storing, I just leave them right in the ice bath and put the whole thing in the refrigerator. This will keep them just fine and always ready for use. I tested the eggs for days 1, 2, 3, 4 and 5, day 1 being the day they were cooked. The results follow taking into consideration appearance, taste, smell and peelability (that's a new word just for hard boiled eggs!).
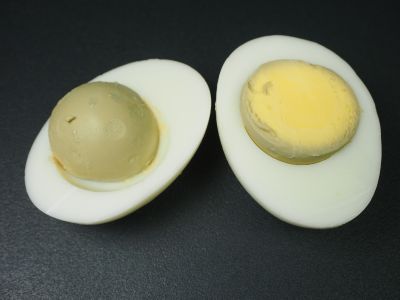
Day 1 - The day 1 egg is perfect in all respects. It peeled perfectly. The white is firm but tender, not rubbery at all. The yolk is fully cooked but moist and a beautiful yellow color all the way through. No discoloration of the yolk is in evidence at all. And the taste is without any sulfur taste at all.

Day 2 - The day 2 egg is virtually identical to the day 1 egg in all respects. There has been no visible degradation of the yolk at this point and the taste and smell are both fine. And of course it peeled without any problems.

Day 3 - In the day 3 egg we are starting to see a slight discoloration of the outside of the yolk. It once again peeled without any issues and looked fine before it was cut open. The taste was fine and I was not able to discern any sulfur odor to the egg.

Day 4 - The Day 4 egg was actually very similar to the day 3 egg with just a slight bit more yolk discoloration. It peeled without any issues and again looked fine before it was cut open. No real odor was detected and the taste was good.
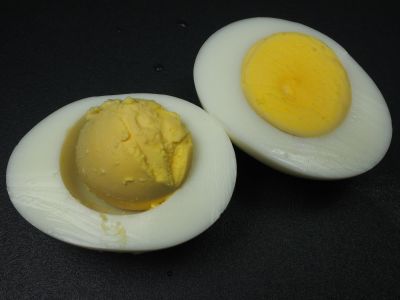
Day 5 - In the day 5 egg we are now starting to see a distinct discoloration of the exterior of the yolk and it is starting to develop a somewhat noticeable sulfur odor. Although when it was made into egg salad it tasted just fine and I am still alive without any trips to the hospital. It peeled without incident and again looked fine before being cut open.
Summary
In conclusion, personally I would not keep them past day 4, which is actually 3 days from the time they are cooked. You can keep them longer if you want but they are so easy to boil, I'm not sure you are saving much. For deviled eggs I would certainly feel comfortable boiling them the day before I was going to make and serve the eggs and that would give them plenty of time to chill properly as well. For egg salad I would feel comfortable using the day 4 eggs but in the future, as I stated earlier, I would not go past day 4.
So get to boiling and let us know how you make out. Enjoy!
Comments
Kori -- April 10, 2018 3:01 pm
I boil mine in the pressure cooker for 5 minutes, the easiest eggs to peel
Share Your Opinion of this Recipe and How You "Make It Mine"
We're very glad you have chosen to share your thoughts. It's what we're all about. (All comments are moderated)
Please enter your name so people will know which comments are yours. You can use your real name or pick a user name if you prefer. To subscribe to our newsletter, enter your email address. And we never share any of your information with anyone, EVER! And if you submit a rating it must be accompanied by a comment and a name to be counted.
Get Our Newsletter!
Recent Comments
The meatloaf was moist, smooth and cooked perfectly through. The glaze was different but terrific...a nice change. Totally recommend and I give 5 s...
Eileen -- 5/17/18
I boil mine in the pressure cooker for 5 minutes, the easiest eggs to peel
Kori -- 4/10/18


